
[Note that Jon Speelman also looks at the content of the article in video format, here embedded at the end of the article.]
I thought this time that we'd return to a topic which I've certainly covered before here and, indeed, two of the examples have appeared at some stage, though quite a while ago, I think. This is the importance of understanding that you need to survey the whole board rather than compartmentalising.
Of course, in many positions the main action will be more or less independent of what is going on elsewhere. But there are others in which apparently tiny twiddles far away across the board may have massive effects, and Diagram 1, which I tend to show to new students to try to gauge their tactical acuity, is very much one of them. It's a back rank problem in which White has to work out how to seize control of c8 in order to deliver mate and if you've seen things like this before, then it's not too difficult, though if you haven't it may be surprising.
The small twiddle of moving White's h-pawn up a single square to h3 completely changes the position, and I might make the general point that when you advance a pawn the move by its very nature weakens some squares and reinforces others, and that you can't move pawns backwards.
I decided on the topic apropos of a somewhat lame segue from vision in the real world, since in the last few weeks I've been having quite a to-do with my eyes. I've been going to the wonderful Moorfields Eye Hospital in London - one of the very best in the world - for four and a half decades now and had a couple of appointments last month at Ophthalmology (checking for problems and an eye test), and then a couple of weeks later at a clinic which looks at the back of the eye and now boasts a snazzy new machine costing over a hundred grand which uses infrared light to check the veins at the back of your eye in detail.
Both visits were more or less as expected, but apparently my glasses were upset because the very next day they got the vapours and the frame cracked (okay, I do know that glasses aren't really sentient). My local optician is just a couple of minutes away, and they were wonderful finding a frame for the lenses within half an hour after looking, he said, at about a hundred different ones. But they're not quite right and after a couple of visits back to them, I returned to Moorfields who explained that you need exactly the right frames for the lenses and proscribed new ones after an exhaustive process - rather like what happened to your feet at an old-fashioned shoe shop as the optician measured every millimetre of the frames we agreed on and my head.
Anyway, I'm therefore waiting for the next week or two till the new pair arrives, and my vision is slightly fuzzier than normal - though, obviously, I can still function since I'm writing this.

I also used this position before at some stage. It's from a game in Moscow 1973, but there have been other instances since it arises naturally - if unfortunately for Black - from a line of the Taimanov Sicilian. White has a lot of firepower aimed at the enemy monarch and if you know your classics - and in particular the famous game Lasker v. Bauer which was apparently played in Amsterdam 1889 - it will be clear that White must at least think about the double bishop sacrifice.
As it happens, this doesn't work in the diagram because Black's knight on d5 is too close to the action, but you might look for a move which deflects the knight so that White can implement his evil scheme.
Once you find it, this works like clockwork but looking at the position at some point I started to wonder if twiddling the queenside would have any effect, and it turns out that if White's pawn is on a3 then the evaluation is very different - you might try to work out or more likely guess why weakening b3 would have such a profound effect. In the third version, the a-pawn is removed entirely which, when you think about it, could easily make White's a1-rook extremely happy...
The stem game Lasker v. Bauer is next in the pgn file, and it's sufficiently important for chess history that my version in the Mega Database is annotated by Garry Kasparov. Having seen the previous examples, you'll know how Lasker continued after Black played 14...Nf6xh5, but it is worth thinking about why the sacrifice works if Black arranges to jettison his queen.
Another important aspect of calculation is continuing variations until the position is quiescent (using singular extensions in chess computer terms). After White wins the queen, Black has a rook and two bishops for her, but there is a move which restores the material balance in White's favour.
I'm greatly indebted for today's final position to Jonathan Mestel and Britbase Supremo John Saunders (www.saund.co.uk/britbase/).
Jonathan was in London on Saturday and dropped in to visit us. At some stage, I told him about today's theme and asked if he could think of a position which fitted. He had a vague memory of sending a letter to the BCM (British Chess Magazine) "about 30 years ago" and had a look on his laptop before firming the game up in his memory to "Kotov v. Gary Lane".
I couldn't find this anywhere and so turned to John Saunders, who very kindly looked through his collection of past BCMs until he unearthed Jonathan's letter not regarding the fictional Kotov v. Lane but Alexander Kotov v. Glenn Lambert from the "Lord John Cup" in 1977, which was held - though I didn't play in it myself - at a hotel about a 15-minute bus ride from me.
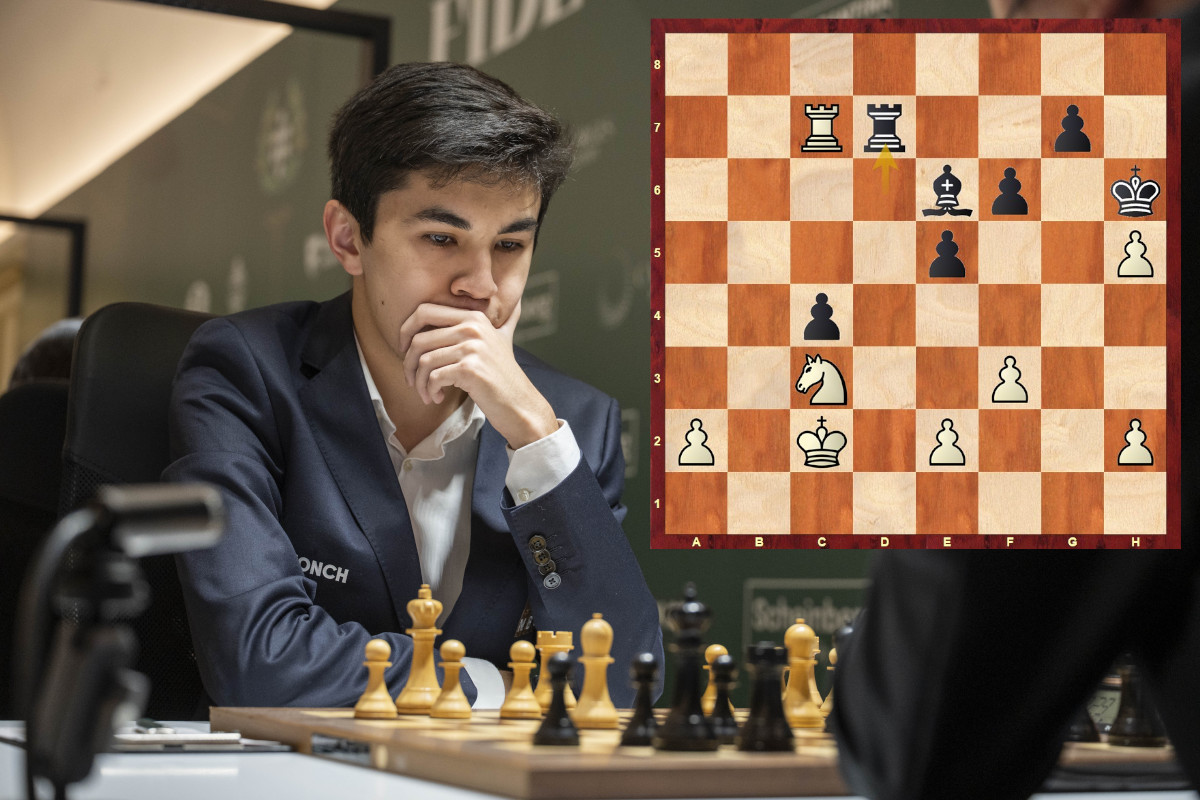
In those far-off days, games were still adjourned, and apparently Kotov sealed 42.Re6+ and proceeded to explain to his opponent that he should resign since after 42...Kd7 (I wonder whether Kotov put the black king on d8, so that it was check) 43.Rxe8 Kxe8, 44.Re6+ decides.
This is all very true and, incredibly, Lambert resigned on the spot, but had he thought calmly for 3.6 micro seconds, he would surely have seen that you don't have to recapture the rook but can play 43...g3!, which turns the position through 180°.
If 42.Rg7+ Kd8 43.Rxa6 Re7! wins, but were the a-pawn on a2 (or a3) then 44.Ra8+ Kd7 45.Rxe7+ Kxe7 46.Ra4! would win!
Since both Re6+ and Rg7+ lose (with the pawn on a4), White should play either 42.Rd6 or 42.Rc6, after which he can force perpetual check with the other rook.
Select an entry from the list to switch between games


| Advertising |