You certainly know the following situation very well from your own experience: My game is totally lost. What shall I do? Resign? Or go on fighting? If I only knew, how! In this article I want to give you some hints, how to save a lost position and how to defend a difficult one. I'll show you the differences between some sorts of bad positions and how to handle them accordingly.
The idea for this article came into my mind when I was analyzing the 5th match game Teichmann - Lee which was played long time ago, in 1901. Curiously enough I knew a woman who was born in 1901. She was my grandfather's sister, a kind person who never believed the story that men had landed on the moon and walked on its surface. In spite of some clear evidence nobody was able to convince her that the moon landing was not a big hoax.
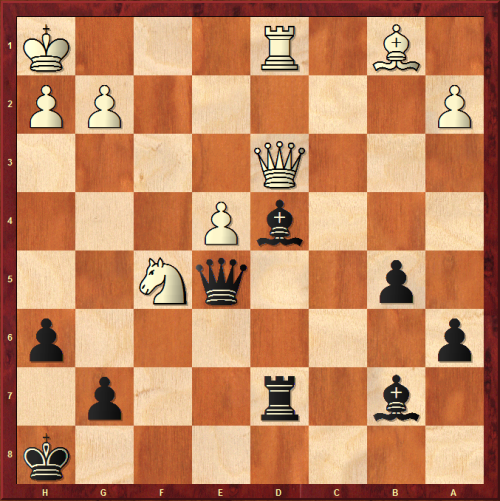
But let's go back to the before mentioned Teichmann - Lee game. In a Scandinavian the London chess master Francis Joseph Lee (1857 - 1909) soon got a bad position. After only 16 moves his game was totally lost, both strategically and tactically. 11 moves later the German grandmaster Richard Teichmann (1868 - 1925) forced a mate in 7 and Lee resigned. He won the match 5-2 with one draw.
I was a little bit disappointed when I saw how Lee defended this hopeless position. He tried a trap which was so obvious that only a complete beginner would fall for it. Soon I discovered that he might have tried a really big swindle, much more subtle and by far not so easy to detect. I'll show you what he could have tried to save the game. But first let's take a look at what really happened:
Now let's examine the subtle defence I discovered. Against proper play it's no use whatsoever, because Black's position is simply lost. But why shouldn't you give your opponent the opportunity to help you out? Let's begin with the same horrible position. A clever defender is needed now!
Did you notice the difference? Francis Lee lost the game without any significant resistance. The clever defender, however, did his best to distract the attacker's attention from persuing his king attack by offering him two pawns. He got two open lines for both of his rooks, and the hidden resource he had prepared was the surprising rook sacrifice 10. ... Rxg2+! Such a move is not so easy to find when you are forced to calculate multiple variations.
The purpose of this DVD is to explain the viewer all main methods of defence: exchanging pieces, creating a fortress, eliminating dangerous enemy pieces, escaping the danger zone with the king, improving the position of the pieces.
"Errare humanum est"
Always keep in mind that you're playing versus a human mind, not a chess engine. Error and confusion may occur at any time. Therefore rely on tactics! Sacrifice a pawn or two, or even a piece, if necessary! Confuse your opponent and compel him to calculate very precisely. He might overlook a subtlety or even make a decisive mistake. Don't forget: You can't lose anything, because your position is already lost.
Lost game or lost position?
Perhaps we should have considered this aspect a little earlier. A position is lost when each possible move at your disposal will lead to defeat. But fortunately a lost position is not identical with a lost game. Why? Because, as before mentioned, your opponent might make mistakes. In fact your game is lost only after you have resigned or after you have been mated. As long as there is a little resource left, some sort of a hidden trap, give it a try. I'll give you an example from one of my own games:
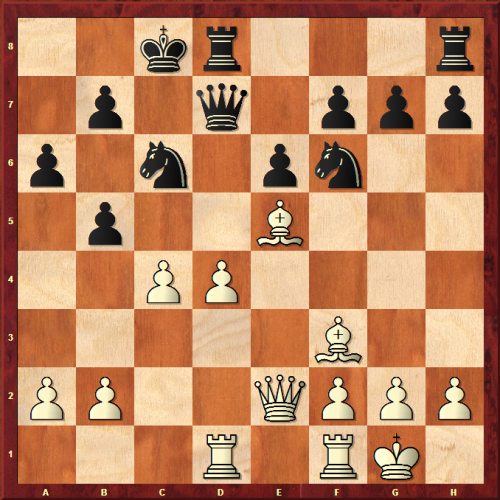
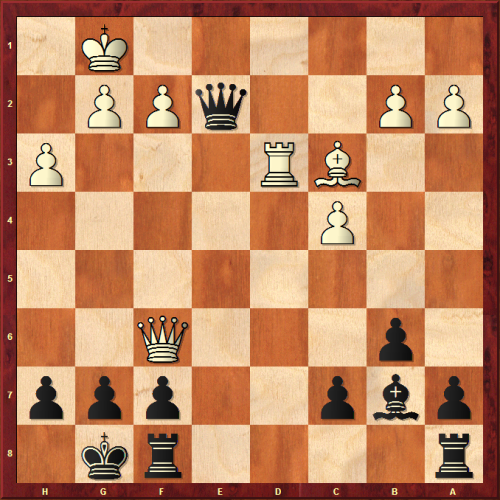
Rudolf Mandl - Platz (Badenweiler 1985)
The white queen is ready to take my pawn on g3. In fact my position was totally lost. Why?
1) White is a piece up.
2) The pawn g3 will soon fall giving the white King a safe retreat to f2.
3) To make things worse, Re4 is under attack.
4) While White is threatening both Nxe4 and Qxg3 I have not a single threat at my disposal, at least no immediate one.
5) I cannot prevent White from completing his development by Bd2 and Rae1. At least I'll be a piece down without any compensation.
It is easy to see that Black is going to lose no matter what he does. It's a typical example of a lost position. What is necessary now?
First step:
Admit that you are in a lost position
A correct evaluation of the position is absolutly essential. If you are not honest to yourself you won't find an adequate answer that might save your game. If your position is only bad, but not lost, don't panic! In such a situation it is not necessary to sacrifice pawns or pieces or do some other crazy things. Try do defend properly instead. Here things are different. By defensive play I could have achieved nothing, e. g. 1. ... Re8? 2.Qxg3! +-.
Second step:
Try to find a hidden resource
When I had to play on in this difficult position I detected a hidden resource that might not only save, but even win the game. No, I was not out of my mind, only speculating. Suppose I were in a position to start a mating attack. How could this be accomplished?
a) Pg3 must not get lost.
b) The black queen must move from d7 to h7.
If Ng5 were somewhere else, he could no longer control h7 nor retreat to h3 blocking the h-file. Well, this is a plan that might work. But, of course, I need a little help from my opponent.
Third step:
Combine tactics with psychology
How can I prevent my opponent from playing Qxg3? How can I persuade him to remove his knight from g5? I tried to slip into my opponent's mind and think what he might think. Somehow I had to convince him that Qxg3 is bad. The only move to prevent Qxg3 is 1. ... Nxd4, because after 2.Qxg3? Ne2+ is winning. But after 2.cxd4! Rxd4 he can take g3 and I'll have only one pawn for two knights while the white King is perfectly safe. This would mean game over. What would you do?
1. ... Bxd4! A bold move and the only one that might save the game. What is the first variation my opponent is going to calculate now? The answer is easy: 2.cxd4 Nxd4 3.Qxg3 Ne2+ losing the queen. Subconsciously he is now warned and likely to think that taking the bishop and taking the pawn are bad. The next step is also easy to foresee: If cxd4 and Qxg3 are bad, then I'll simply take the rook on e4! And in fact he did so after comparatively short thinking: 2.Nxe4?

I waited for a while enjoying the situation, played 2. ... Rh1+! and he resigned. It is a mate in 4 moves: 3.Kxh1 Qh7+ 4.Qh5 Qxh5+ 5.Kg1 Qh2+ mate. Of course, by taking the pawn on g3 with his queen instead of grabbing the rook he would have won the game.
If you think that only a weak player will fall for such a trap, you'll be disappointed: In 1985 Rudolf Mandl played for SC Heidelberg in the German Bundesliga. He was not weak at all, but only incautious. He had played very well so far and could have won, if he had only spent more time on his last move. When we analyzed the game afterwards he told me that just a few seconds after he had played Rxe4? he detected the winning rook sacrifice. The ten or twenty seconds I let him wait must have been a horribly long time for him.
Do not resign prematurely
From these examples you'll have learned that it is not advisable to resign too soon. Suppose you're playing with the white pieces a hopeless pawn ending where your opponent has two united passed pawns on c7 and b6, while you have only a pawn majority on the king side. For you it is easy to see that he can simply advance his passed pawns distracting your King in order to stop them. Afterwards he would have plenty of time to collect your king side pawns. But will he see it, too? A grandmaster certainly would, but when playing against another amateur I would take no notice of the queen side, but try to look optimistic and advance my pawns on the king side in order to create a passed pawn as soon as possible. Perhaps he will forget about his own passed pawns and focus on defending against my threats. If he wastes one move to many, I might save the game.
Study the endgames carefully
In fact a good way to avoid unnecessary losses is to know a lot about endgames. Many players focus on the openings and wonder why they make so little progress. In New York in 1924 former World Chess Champion Dr. Emanual Lasker had to defend a critical position against Edward Lasker:

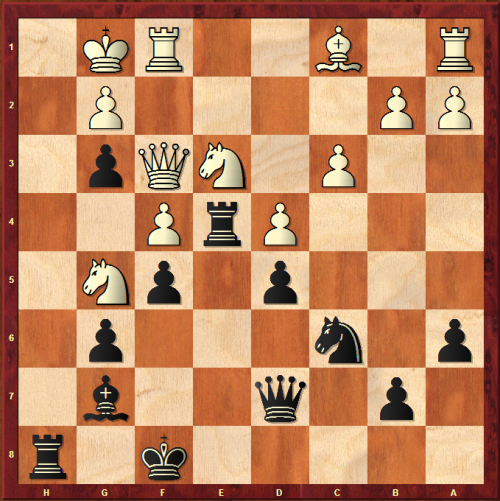
Emanuel Lasker – Edward Lasker (New York 1924)
The name Emanuel Lasker will always be linked with his incredible 27 years reign on the throne of world chess. In 1894, at the age of 25, he had already won the world title from Wilhelm Steinitz and his record number of years on the throne did not end till 1921 when Lasker had to accept the superiority of Jose Raul Capablanca. But not only had the only German world champion so far seen off all challengers for many years, he had also won the greatest tournaments of his age, sometimes with an enormous lead. The fascinating question is, how did he manage that?
White's pawn on g7 will soon be lost. Isn't it time to resign? Emanuel Lasker played 1.g8Q+! Rxg8 2.Kc4 and easily drew the game. He knew that in positions like this even a rook and pawn cannot win against a single knight supported by his King.
Before you resign, consider each possible move
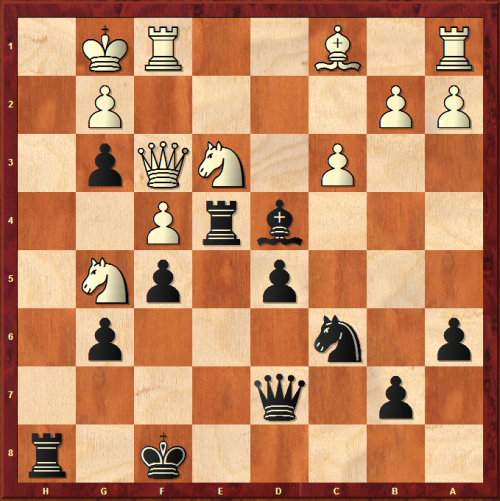
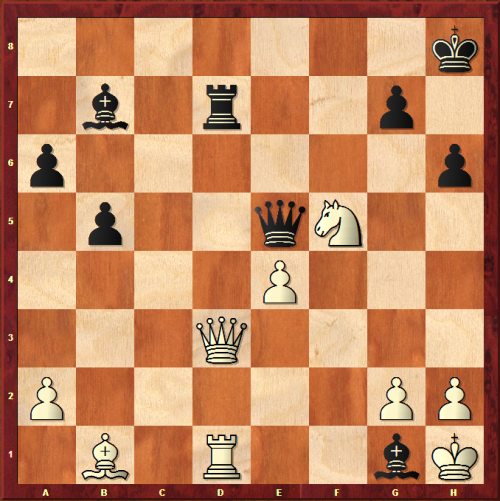
A good method to avoid unnecessary losses is to consider and calculate the consequences of each possible move. Here is a classical example: After 45 moves White's position looked hopeless. Do you think that he should resign?
Carl Ahues (1883 - 1968), winner of the German Chess Championship in 1929, once played a casual game against an amateur in which he was a rook and a knight down. The following diagram will show you the critical position:

Do you think that there might be a saving move? By applying the recommended methods, you should be able to find one. Did you spot it? (If not, please be patient, I'll give you the solution a little later.)
Do not mix up a lost position with an only seemingly lost one
From these examples you'll have learned that there is a big difference between a really lost position and a position which only seems to be lost. But even the weirdest things happen time and again. In some cases chess players resigned in spite of having a winning position. They simply didn't realize what was going on. If they had followed my advice to calculate carefully the consequences of each possible move at their disposal they wouldn't have resigned, but played the winning move instead. Perhaps you have already heard of the following classical example:
Ignatz von Popiel - Georg Marco (Monte Carlo 1902)
White had just moved his Rook to d1 attacking the pinned bishop on d4 for a third time. Black therefore resigned. What would you have done instead?
The aim of this course is to help you understand how to make tactical opportunities arise as well as to sharpen your tactical vision - these selected lectures will help to foster your overall tactical understanding.
Here is another classical example:
Carl Ahues once played a casual game against an amateur. Doesn't this sound familiar? He had found a brilliant queen sacrifice to save a completely lost position:
You'll notice that this is the answer to my question from diagram 6. I guess that Mr. Ahues looked very optimistic when he sacrificed his queen, because Black, shocked by the surprising 1.Qxf6!!, resigned at once. He didn't see any move to avoid mate. If the queen is taken, Rg3+ and Bxf6+ mate will follow.
Would you have resigned, too? Or is there any saving move?
Answer: Yes, there is. Sure, after 1. ... Qe1+ or 1. ... Qd1+ White simply plays 2.Kh2!, but 1. ... Qg4! is good enough to win the game. By this move Black is not only threatening Qxg2+ mate, but also protecting g7 at the same time. White may do whatever he wants. In each case he will be at least a rook down. In spite of the saving move 1. ... Qg4! the queen sacrifice 1.Qxf6 was completely justified, because after every other move Black certainly would have won the game.
Do not calculate too selectively
Occasionally we tend to overlook certain moves because of our human "selective" approach. This is our great strength and a weakness, too. We often exclude a move like 1. ... Qg4 from our calculations, because in 999 out of 1000 cases it is bad to throw away the queen. But there are exceptions like in this instance. The seemingly lost position after 1.Qxf6!! was in fact still a winning position for Black.
Therefore always keep in mind the differences between the various sorts of "lost" positions. There might be a hidden winning move in even the worst looking cases or you may find a hidden resource with a subtle trap. If your opponent is already very optimistic, it might work and hopefully you'll be able to avoid several unnecessary losses from now on.
Finally let's take a look at the solution from the Marco game: 1. ... Bg1! threatening mate would have won the queen and the game.
But you wouldn't resign after 1. ... Bg1, would you? Suppose you're playing for your club and your opponent is in serious time trouble. If only a win will help your team, what would you do? If a draw is enough, what else would you suggest?
Forget all about the "best" move
Let's summarize: In a lost position the main principle is not to play the theoretically "best" moves, but those which offer you the best practical chances. If such a move is identical with the "best" or "correct" move, then go ahead! But if not, choose an objectively bad one that might give you a chance to hold or sometimes even win the game. What else can you hope for in a "lost" position?
Links
New York 1924, Round 20: Fortune favours the brave